

Abhishek Dewan
-
Posts
1604 -
Joined
-
Days Won
89
Posts posted by Abhishek Dewan
-
-
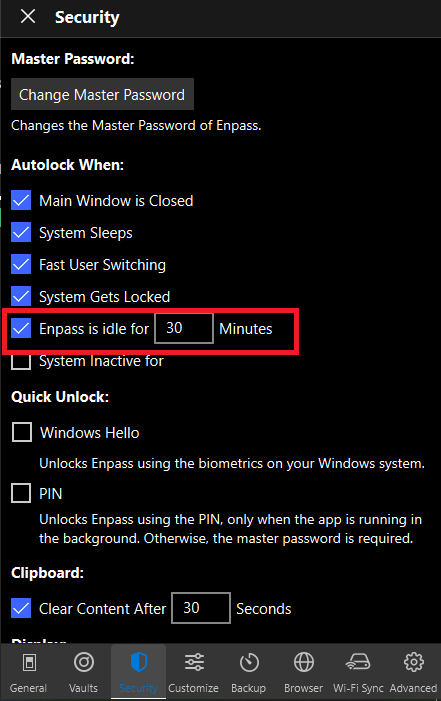
Hi @hshjezai
For your Yahoo Mail account, getting expired after a session, please refer to this link. You may modify the time to suit your own preferences.
Also please change the settings of your Enpass Application for Auto-lock by going to Setting's -> Security -> Change the time under Enpass is idle
-
Hi @Aliased
Thank you for your patience .Our concerned team has identified the bug where some graphic drivers cause issues while rendering text in Qt (GUI framework Enpass uses). We are testing a patch provided by the upstream vendor for resolution. A fix will be available in the future Enpass update. Appreciate your co-operation.
-
-
Hi @hshjezai
Welcome to the Enpass Community!
Please share the below information with me and I will get it checked for you -
- Version of the Enpass App you are using
- OS of the device you are using
- The web-browser you are using
-
Hi @vas
Welcome to the Enpass Community!
I did check this for you with our tech expert team, Enpass Auto-Fill not working for SunSuper App. For better testing can you please help us know any other Apps in which you are facing similar issues.
Thanks
-
Hi @Thoughts?
I have forwarded your request for the above-mentioned UI feature to the concerned team so that they can consider this for future Enpass versions. Appreciate your patience in the meantime!
-
You're not using the stable version of Enpass Extension. It seems you might have initially installed it from our old beta channel on Chrome Web-Store which was discontinued long back. The pop-up that obscured your auto-fill flow is an experimental feature that slipped into your extension through that channel. We advise you to remove this extension from Chrome and install the latest stable version from the Chrome Web Store.
Sorry for the mix-up. Happy auto-filling using Enpass!Cheer's!
-
For this, you need to create a new vault, copy the items you would like to share, then inform the sync details to the other user. Here's how you can do it -
a. (For you) Sync vault data over a cloud account
- Create new vault, copy the items you want to share.
- Sync new vault with any of the supported cloud services in Enpass.
-
Share newly created cloud login credentials and vault password with the user.
b. (For another user) Restoring vault on other devices with cloud sync
-
Other user can restore the vault data either from the Welcome page or create a new vault in Enpass under Settings, restore the data via sync using the same cloud account as in Step a(2).
Cheers!
-
 1
1
-
-
Please share the Enpass Extension version which you are using on your browser and I will get it checked with the team. You can find it under Settings -> Extensions -> Enpass Extension -> Detail's.
@DypsisThanks for notifying your issue got resolved!
-
Hi @Welshdog
Thank you for bringing this issue to our attention. Our team has reproduced the bug on their end and we are working on getting it fixed. The fix will be implemented in the future Enpass updates. Appreciate your patience in the meantime.
-
1
-
-
Hi @rigmarole
Welcome to the Enpass Community!
Please share the below information with me and I will get it checked with the concerned team -
- The OS you are using on your desktop and its version
- The version of the Enpass App you are using
Would also suggest you to check the following links to make sure you are not missing any steps while trying to setup Wifi Sync-
- For Setting wifi sync through Manual Setup
- For setting wifi sync through QR Code
- For Troubleshooting
-
Hi @Akki
This error arise when a NextCloud server disconnects the file transfer before it is completed. Can you check with your WebDAV server for a possible misconfiguration?
Thanks
-
Hi @Radek
Welcome to the Enpass Community
Great to hear that you like Enpass, thank you for all the support! I have forwarded your request for the above-mentioned UI feature to the concerned team so that they can consider this for future Enpass versions.
-
1
-
-
Hi @Roobert
Since a sync server is already running on your iMAC, you do not need to run Wifi sync server on your MacBook Pro. You can connect your MacBook Pro to iMAC sync server just like your handheld devices. Please follow the below instructions to set it up -
- Open Enpass on your iMAC which is running the server. Go to Settings > Wi-Fi Sync > Select the vault you want to sync > Manual Setup
- Now open Enpass on your MacBook Pro . Go to Settings > Vaults > Select the vault you want to sync.
- Click on Set up Sync > Wi-Fi Sync.
- Select the same Wi-Fi server displayed on the iMAC device running the Wi-Fi server.
- Verify the connection with the code and click Yes, go ahead.
- Select the vault you want to sync.
- Enter the “Access Password” displayed on the “Manual Setup” page on Wi-Fi Sync Server
This should sync your MacBook Pro as a client. Let me know if you face any issues with these steps.
-
 1
1
-
Hi @gyan000
You can adjust the columns to a certain degree in the application by dragging the edges of the column towards left or right. I have also shared this as feedback with the concerned team for more flexibility. Appreciate your patience in the meantime.
-
Hi @jshea
Welcome to the Enpass Community!
Please provide the below information and I will get this issue checked with the dedicated team -
- The version of the Enpass application you are using on Microsoft Surface Pro 7
- The OS version of your device
-
Hi @Krisz
Thank you for bringing this issue to our attention. Our team has reproduced the bug on their end and we are working on getting it fixed. The fix will be implemented in the future Enpass updates. Appreciate your patience in the meantime.
-
1
-
-
Hi @Victor
At the moment this is not configurable in our application. However, I have shared this as a feature request with our development team and it will be implemented in the future Enpass versions.
-
Hi @gyan000
Welcome to the Enpass Community!
Thank you for bringing this issue to our attention. Our team has reproduced the bug on their end and we are working on getting it fixed. The fix will be implemented in the future Enpass updates.
-
Hi @Will.iam
It seems that we have some issues with existing database file. We should restore a working version from backups first to restore your data. Please follow the below steps on your MAC:
-
Quit Enpass(if Open) using Command+Q.
-
Depending on the OS, Go to following Path in your System:
/Users/$Username$/Library/Containers/Enpass/Data/Documents/
OR
/Users/$Username$/Library/Containers/in.sinew.Enpass-Desktop/Data/Documents/
Note - You might see multiple folders named Enpass here, please check in all such folders where you may find the Folder named Vaults. Also, Enable View hidden contents in Finder
-
Here you will see a folder named Vault. Rename this folder. Say to “XYZ”
-
Now launch Enpass Application. It will launch from Welcome Screen.
-
Select Previous Backups Option
-
Now Restore the latest Backup by providing your Master password.
-
You should be able to restore Enpass from last backup state now
Please let me know if you were able to access your data after following the above steps.
-
Quit Enpass(if Open) using Command+Q.
-
Hi @agno
Enpass does not allow "#" as an extension shortcut for autofill in keyboard layout as it considered as a secondary key by the key capture library used currently. Please let us know if you are unable to use other key too and which keyboard layout are you using.
-
Hi @AndreasN
Welcome to the Enpass Community!
Thank you for bringing this issue to our attention, I have shared this feedback with our development team. I'll let you know on this forum as soon as I get any update. Your patience is highly appreciated!
-
Enpass browser extension opens a new tab instead of autofilling
in Windows PC
Posted
Hi @testuser1234
Welcome to the Enpass Community!
In order to assist you better with your query, please share the below information with me and I'll get it checked with the team-